
Instruction Manual
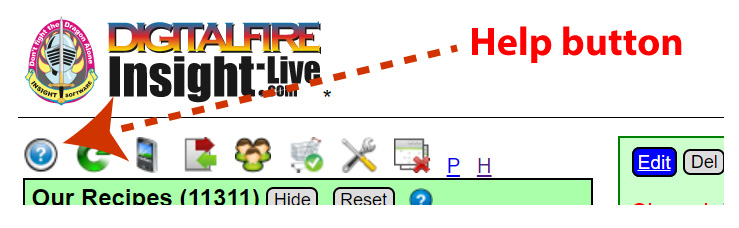
When you are logged in, click the Help button.
That will open a help panel like this (to the right of any panels already open).
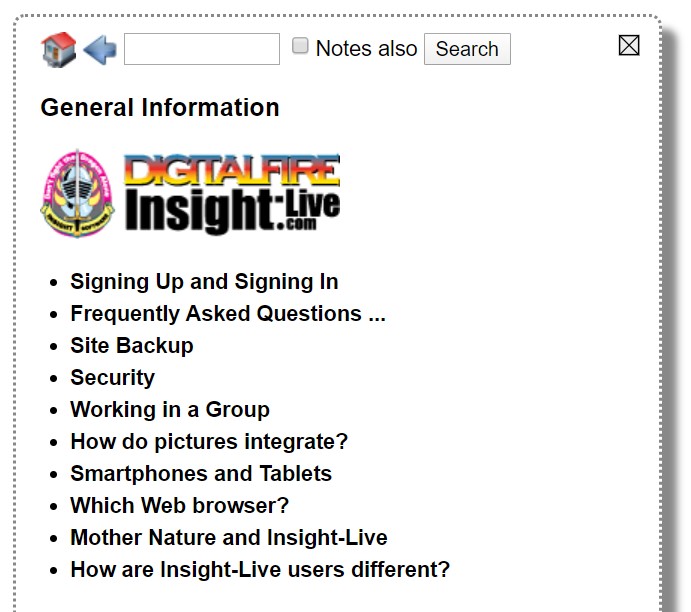
The help home page looks like this. Return to it any time using the Home button. Click items to open them. Use the back button to go back. Use the search field to find help items (the 'Notes also' checkbox searches in the notes as well as the titles and keywords).
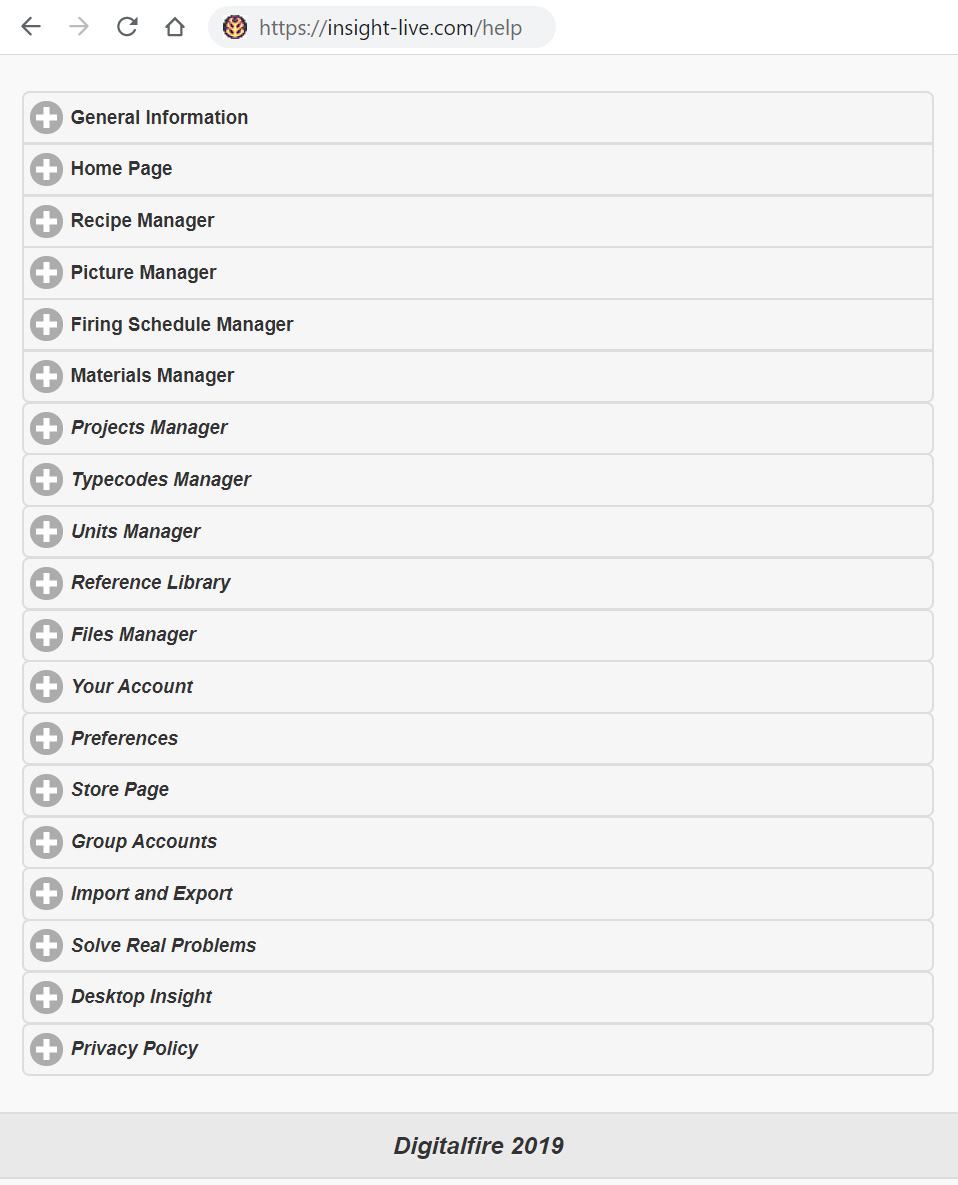
To open the manual outside of Insight-live (e.g. on your phone) visit http://insight-live.com/help. It will look like this.
Home Page
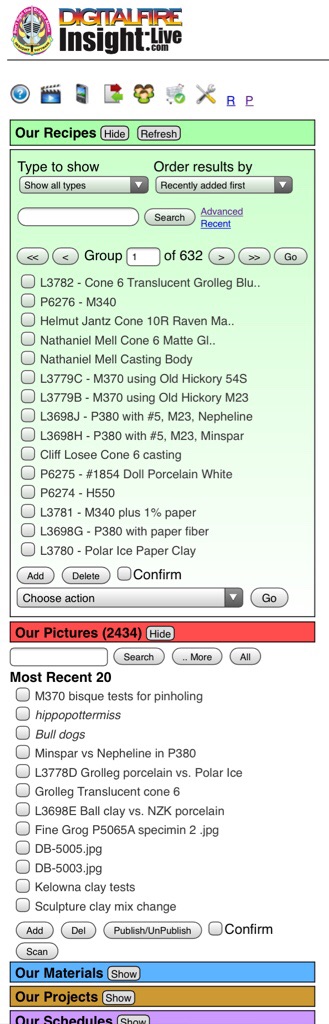
The manager panels (e.g. the Recipe manager, the Picture manager, the Materials manager), stack on top of each other on the left (as you open them). These managers have brightly colored title bars, each having hide and showbuttons and optionally others. The Recipe manager is green; it is the core of the system and the most persistent of the manager panels (staying open by default).
An open manager is used to find, add and delete records it manages (e.g. recipes, materials). When you click records in the hitlist within a manager, vertical panels open rightward to see and edit the detail.
Home Page
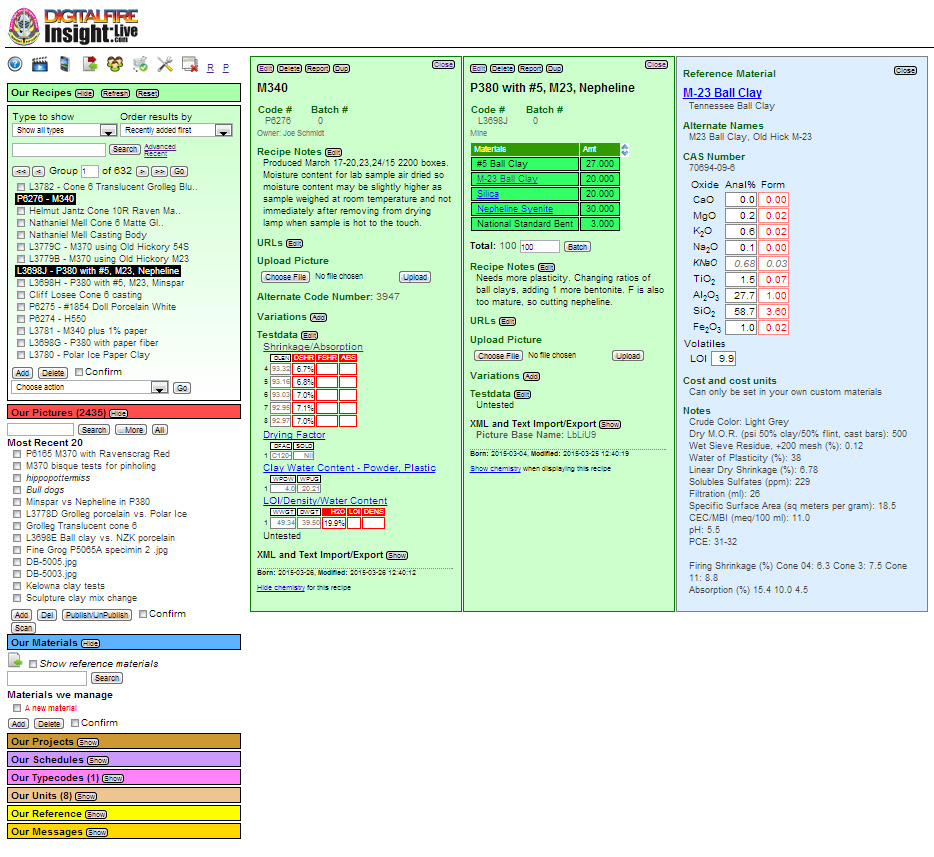
In the page shown above, the recipe and materials managers are open on the left, and two recipe panels (green) and one material panel (blue) are open.

The general toolbar always displays at the top left. Depending on your level of access, you will see these icons. On a desktop browser, each icon has a popup tip explaining its function. The icons provide quick access to help, import functions, the Preferences page, the Insight-Live Store page (where you can renew your account), etc.
Links to login/logout, contact us and see your account page display on the top right like this (top left on phones). Phones will show the links as icons, whereas on the desktop you will see them as text (like the following).
Panels are tall and narrow so that they will scroll well on portable devices. When you click on items in the manager panels, the detailed information previews and opens in panels that grow to the right. When panels display as previews (not open) they have a dotted border. They live only until the next click (or tap). Panels have open, edit and close buttons as appropriate.
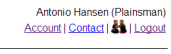
Below is an example of two panels (to the right of the manager panels). The green one is an open recipe and the gray one is a picture that is previewing (notice the dotted border).
The recipe panel title bar has a reset button. Clicking (or tapping) it will collapse the manager panels, close the detail panels and zero the search field in the recipe manager.

Recipe Manager
Go to Topic: Recipe Manager
Picture Manager
The Picture Manager is about documenting your photos with labels and notes and managing the size of the photos themselves (to avoid waste and system slow-down). Insight-live stores uploaded pictures as files and their meta-data in a picture record in the database system. Although photos display only to the width of the panel, they are full resolution when pinch-zoomed on your tablet or phone to see full quality).
The Picture Manager enables you to search, add and delete picture records. The Picture Panel provides tools to upload pictures and crop them, maintain meta-data (titles and descriptions) and link/unlink to recipes. Pictures can stand alone or link to one or more recipes.
It is wise to be aware of the dimensions and file size of your pictures (crop them only to the needed part of the image and resize to take less storage space).
Go to Topic: Picture Manager
Firing Schedule Manager
Go to Topic: Firing Schedule Manager
Materials Manager
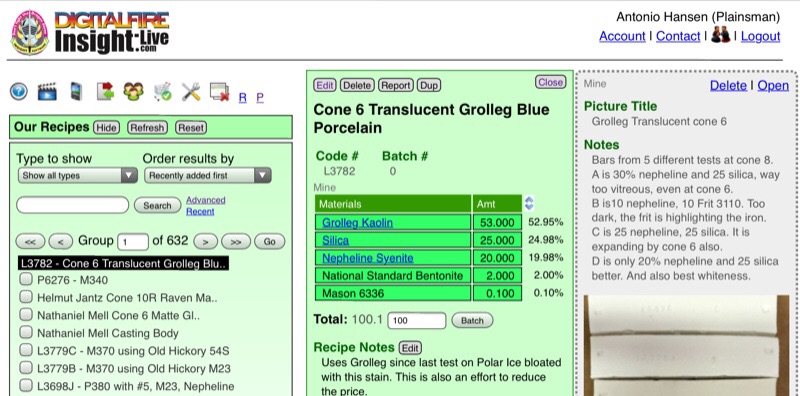
The Material Manager has the blue-background title bar on the left. The title bar specifies My Materials or Our Materials depending on whether you are accessing the system through a personal or group account. At the top, it provides a search field and buttons to initiate a search in the reference materials or your own. The hitlist search result provides links to see the detail for each, click an item and it will be opened in a panel to the right. If you are searching your own materials, a Material Chart button at the bottom will display a chart of rows and columns showing the comparative chemistries.
Insight-live needs to be able to find materials in recipes (to calculate accurate chemistry and cost). Thus, use correct names when entering recipes (since an exact match is not required here in the Materials Manager it is possible to find materials by specifying a part of their names).
Reference Materials
Thousands of these are built in and in most cases, it will not be necessary to enter your own. Reference materials include generics (e.g. talc, ball clay, kaolin) and in many cases, the chemistry calculation is sufficiently accurate to use these either as the Material or in the Lookup field for a line.
Managing Your Own Materials
To calculate recipe cost or use materials not known by the system or to specify a different chemistry for a material it is necessary to manage your own material list. Your recipes can reference a mix of your own and reference materials, Insight-live preferentially searches yours first and then the reference materials. Materials in your list can simply specify a cost yet reference the chemistry of a reference material, or they can override the chemistry. Some companies (e.g. frit manufacturers) need to be able to enter the chemistry for each batch of specific materials received so their formula-to-batch calculations are as accurate as possible. In these cases, it is common to add the material but name it with a shipment-number-suffix (and specify that in recipes).
The Materials Chart button is available when searching your own materials. This is handy for formula-to-batch calculations, look down the column for the oxide needed to find candidate materials to supply it.
Adding and Deleting Materials
Use the Add and Delete buttons at the bottom. Deletes must be accompanied by checking the Confirm checkbox. You can also import batches of materials in the Import and Export dialog.
Calculating Recipe Cost
Look for information on this in the calculation section.
Go to Topic: Materials Manager
Projects Manager

Projects enable grouping selected recipes into a context (building audit trails that can later be followed). They provide a place to put notes that refer to the project as a whole, outline its goals, summarize the results, etc. When you click Search 20 project listings will display. If a search generates more than 20 make it more specific.
Use the Add button to add a project within Project manager (brown title box on the left). The project record will open in a panel where you can change the name, order in which it will appear in the list and the notes. To delete a project, check the checkbox next to the title and then click the Del button.
To edit a project, just click its name in the list to preview it in a panel, then open it in a panel using the link provided at the top.
Projects can link to recipes and pictures (providing a quick way to open members). To link a recipe to a project, open the project panel and then open one single recipe next to it. A clickable link will appear in the project panel to establish the link. Link more in the same way (alternatively you can link recipes to each other in the order you want them to be opened). To link a picture, do the same (however the clickable link to make the join will appear in the picture panel instead).
To add a URL or email address to a project, just click the Edit button beside the URLs or Email headings (in the project panel).

Typecodes Manager

Typecodes are used to put recipes into categories. This is preferable to assigning them to folders since a recipe can have multiple categories.
The Typecodes Manager panel expands from a headline below the Recipe Manager panel. Typecodes are assigned to recipes simply the typing their three-letter abbreviation into the Typecodes field within the recipe. When the recipe is displayed or printed the full name of the typecode will be shown. Recipes can be assigned multiple types by entering multiple typecodes separated with spaces.
Use the Add button to add a typecode. Check a checkbox and click Edit to change the name of a typecode (the edit will occur within this panel). Check a checkbox and click Delete to remove a typecode (if Show Delete Confirm checkboxes is set on in the Preferences page, there will also be a confirm checkbox here that has to be checked for delete to proceed). The Check All button can be used to edit or delete all the codes.
Typecoding of recipes is done this way so they can be exported and imported without loosing their codes. Although Insight-Live may not know the meaning of a code, it will still show it for a recipe, you only need to define that code for Insight-Live to show the full name in recipes.
Units Manager
Volume units are never used in ceramic glaze and body recipes (because different powders can have drastically different weights-per-volume-unit depending on the particle size and shape, settling time, moisture content, parent mineral form, etc). Typically, hobby glaze recipes do not even specify units. And they usually total 100. Most people know that making a glaze from 100 grams of powder will produce about half a cup. We control the total weight of a batch by simply retotalling it. For example, to mix a gallon (about 3000 grams) we multiply a one-hundred-total recipe by 30.
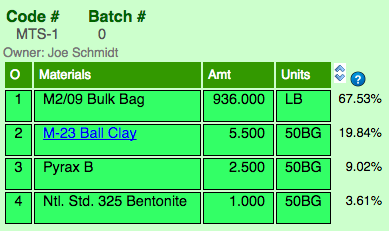
Recipes generally just have numbers that normally total 100. Potters mix batches in grams, kilograms or pounds (to make 10,000 grams, for example, just multiply the numbers by 100). But in production situatVoluions mix tickets need to be printed. These tickets often include full-bag quantities of materials (specified in the number of bags), liquid units or volumetric quantities. In this ticket, "50BG" means 50 lb bag ("LB" is pounds).
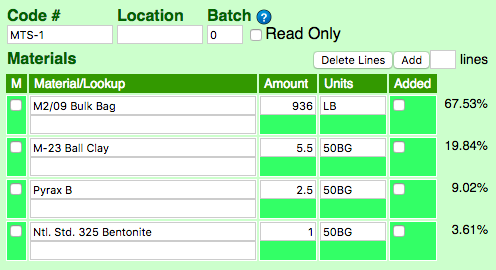
This is the same recipe in edit mode. Notice the units for each item have been filled in to the Units column (most of the time we ignore that column). These must be valid abbreviations as defined in the Units Manager. The percentage column on the right is calculated based on the weight of each unit.
Go to Topic: Units Manager
Reference Library

The Reference Manager appears below the other managers on the left of the home page. Click the Show button to reveal it. At this time each category is a link to a section of the Digitalfire Reference library. The link logs you in automatically (login is important because it enables and reveals various features). For the link to work your Insight-Live and Digitalfire accounts must share the same z-value, a random key assigned to your account automatically. This link gets established automatically the first time you login to Insight-Live using your Digitalfire.com email and password; but if there is a problem please contact us.
There are other parts of the reference library not linked, we will add those later. In addition, we will also be moving various parts of the library to be administered locally at Insight-Live so you can create your own private version that builds on what is already there and the records of which can link with your recipes, materials, tests, etc.

Files Manager
This is the home of a file store for group accounts (in future for personal users). Typically instructors upload coarse ware and students log in and download the files. Group admins can upload and maintain a wide range of document types (e.g. PNG and JPG pictures, Microsoft and Open Office document, spreadsheet and presentation files, PDF). Group members can download them. With each document you can enter a title, notes and add multiple URL links.
We upload the desktop Insight program installers here and all users (group and individual) can see and download them by clicking the Public checkbox and then the Search button.
Your Account
You have access to your account page by simply clicking on your name (on the top right).


At the top, you can change your password for your personal account and or the name of your group (for group accounts, passwords and user names must be set on the User Manager page). When you first open an account, the system assigns you a personal password, and it is not encrypted on our server. However, you only have a limited time in which to log in on that password (before it expires). During that session, you need to come to this page and encrypt a new password. Once that is done, we cannot retrieve it. If you forget it in future, use the email login feature to get a one-time login link.
Your contact information includes areas to specify your company relationship the names and emails of people in your IT and Purchasing departments (the latter are need for printing quotes and invoices on your store page).
Preferences
You can access your personal preferences page by clicking this icon in the toolbar on the top left. The page divides preferences into theme panels that will vary according to your level of access (click the radio button for each at the top).
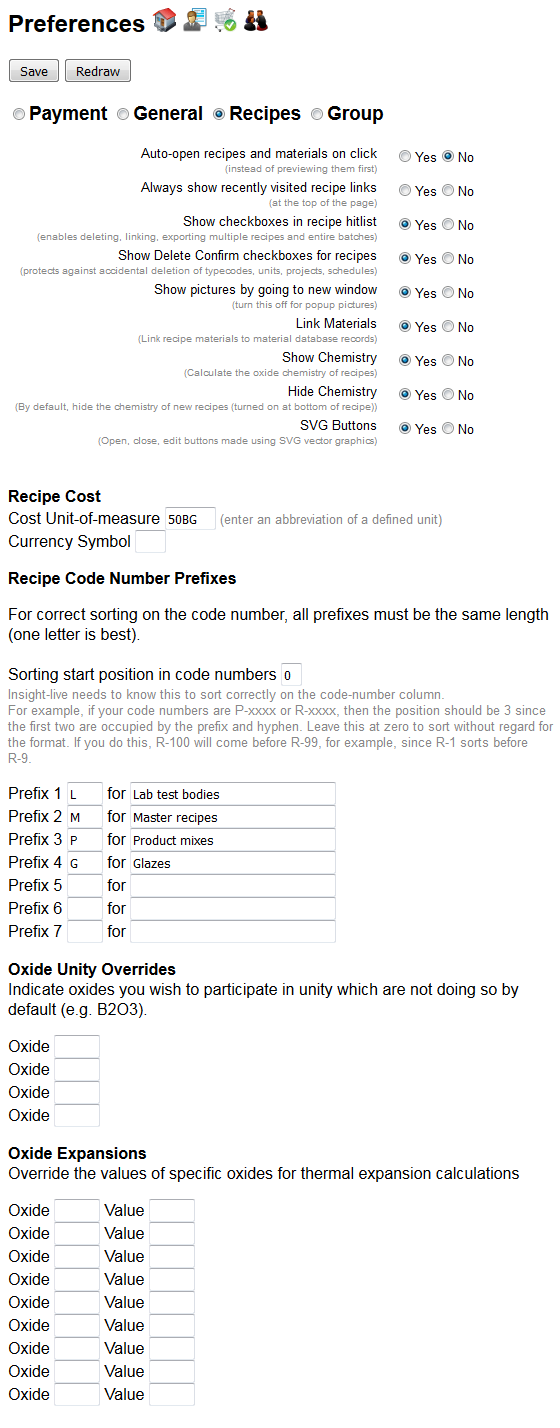
The Recipes panel (shown here) is the one you will most often need (many of the items shape aspects of the user interface). Others relate to the way you organize things and how calculations are done. Of special interest is the fact that you can customize the unity oxides and oxide thermal expansions that are used when calculating the chemistry of recipes.
Store Page
You can access your Insight-Live store page by clicking this icon in the toolbar.
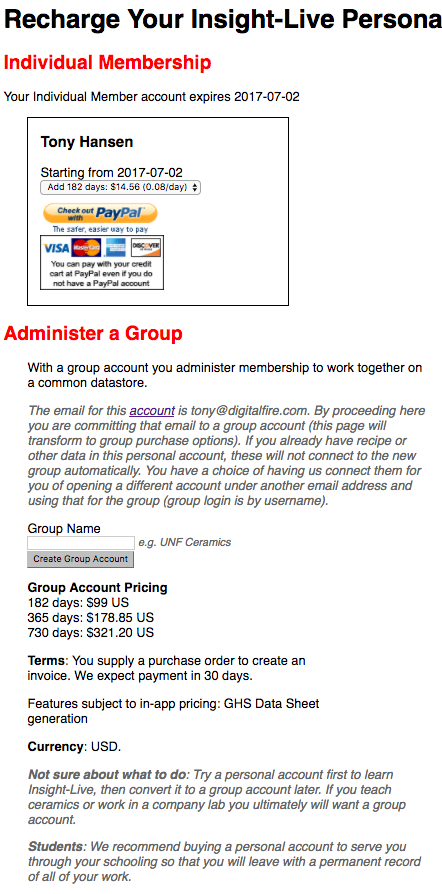
The page will display your status and level of access and provide opportunity to purchase better access. Payments are handled at PayPal.com and you can pay using your PayPal account or a major credit card.
Group Accounts
Group and Managed accounts use titles like 'Our Recipes', 'Our Pictures', etc (rather than 'My Recipes' and 'My Pictures'). When group users add new recipes, the default name will include their name.
As administrator, you will be able to add and edit any kind of data and edit the information entered by any members. The degree to which you control what members can do is changing as we evolve the site. But initially, a group member can edit anything created by any other member except the actual materials and amounts in a recipe. Membership in Managed group accounts is handled by us.
Group members have no expiry date; only the group as a whole expires. You will be notified of your account status in our monthly email (unless you have unsubscribed or our emails bounce). It is your responsibility as the administrator to renew before it expires. You can extend the expiry date at any time. Insight-live does not erase the data for the group if it expires (unless you request that). For Managed Groups, we make sure it does not expire.
If group members also want to have their own private account at insight-live.com, they need to register it under a different email address.
You can change the group name on your account page.
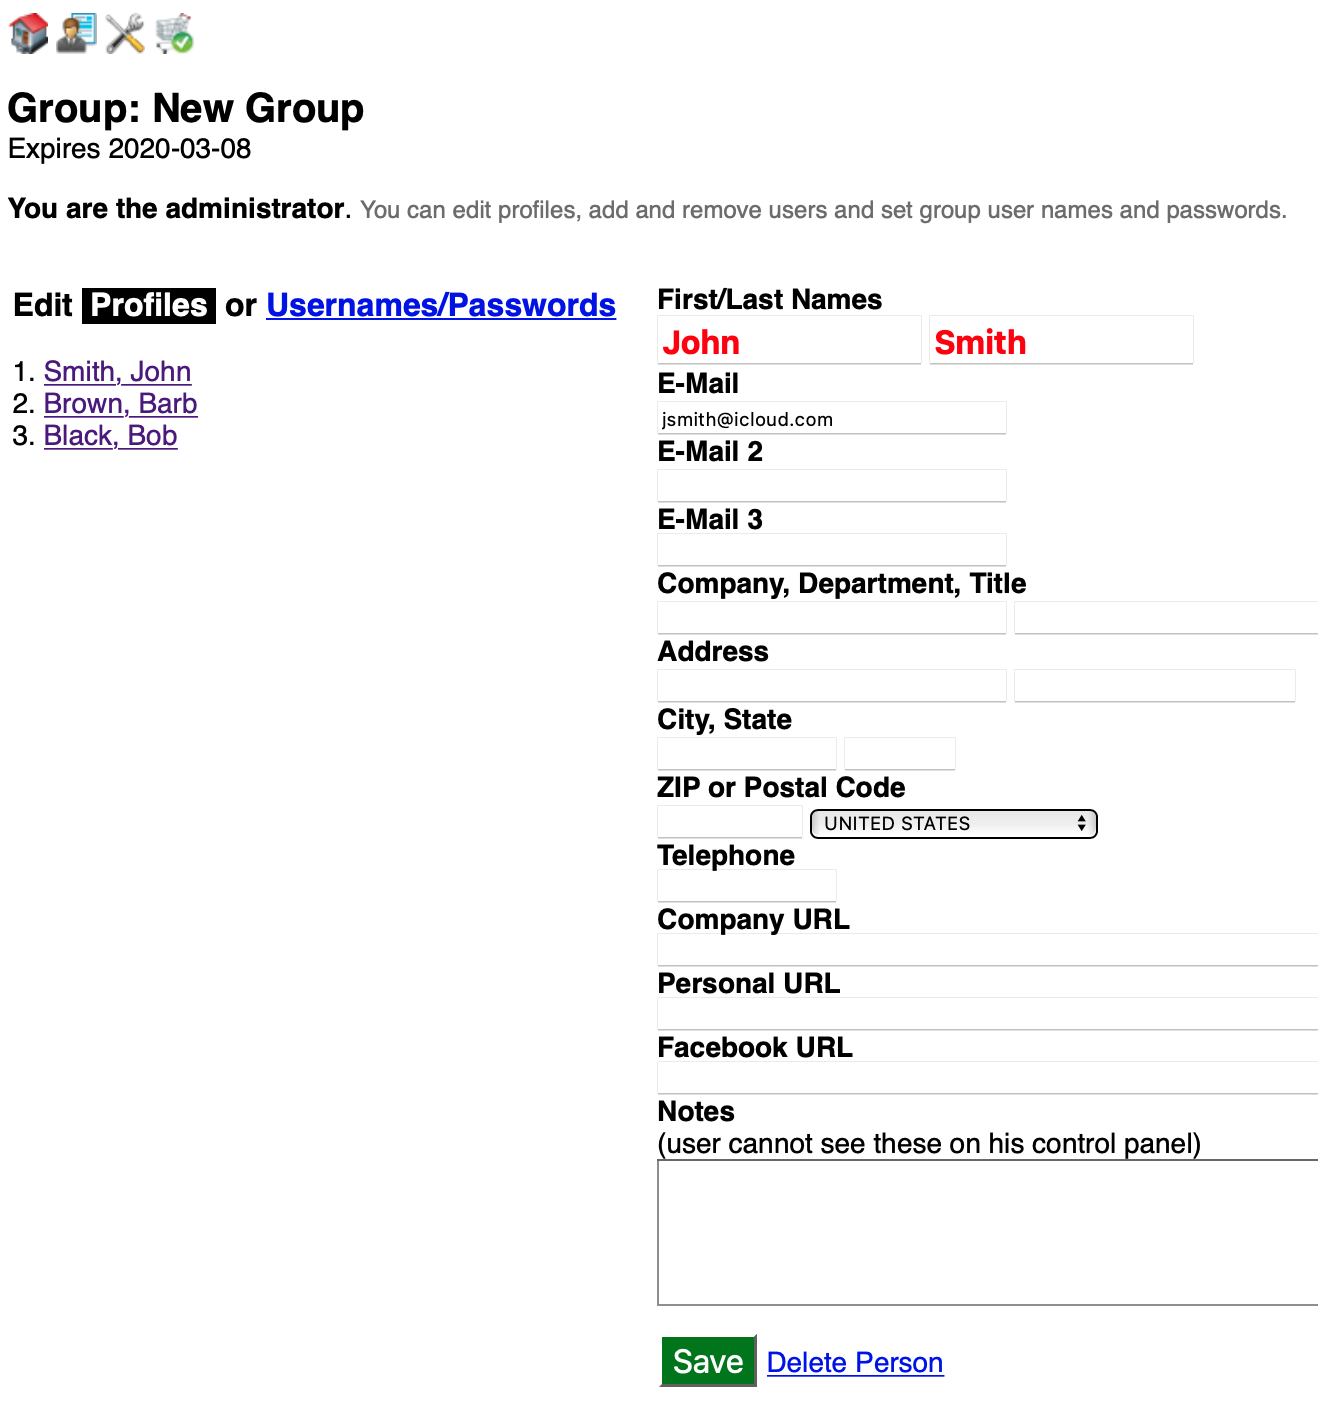
For the Group management page, click User Admin icon on the upper right. The page initially looks like this. It supports adding users and setting their usernames and passwords. And editing their profiles.

The page defaults to profile viewing and editing. Members are listed on the left. Click a name to edit their profile on the right. None of the fields are actually required, but the presence of an email enables them to receive our messages. To add a user, see the next section.
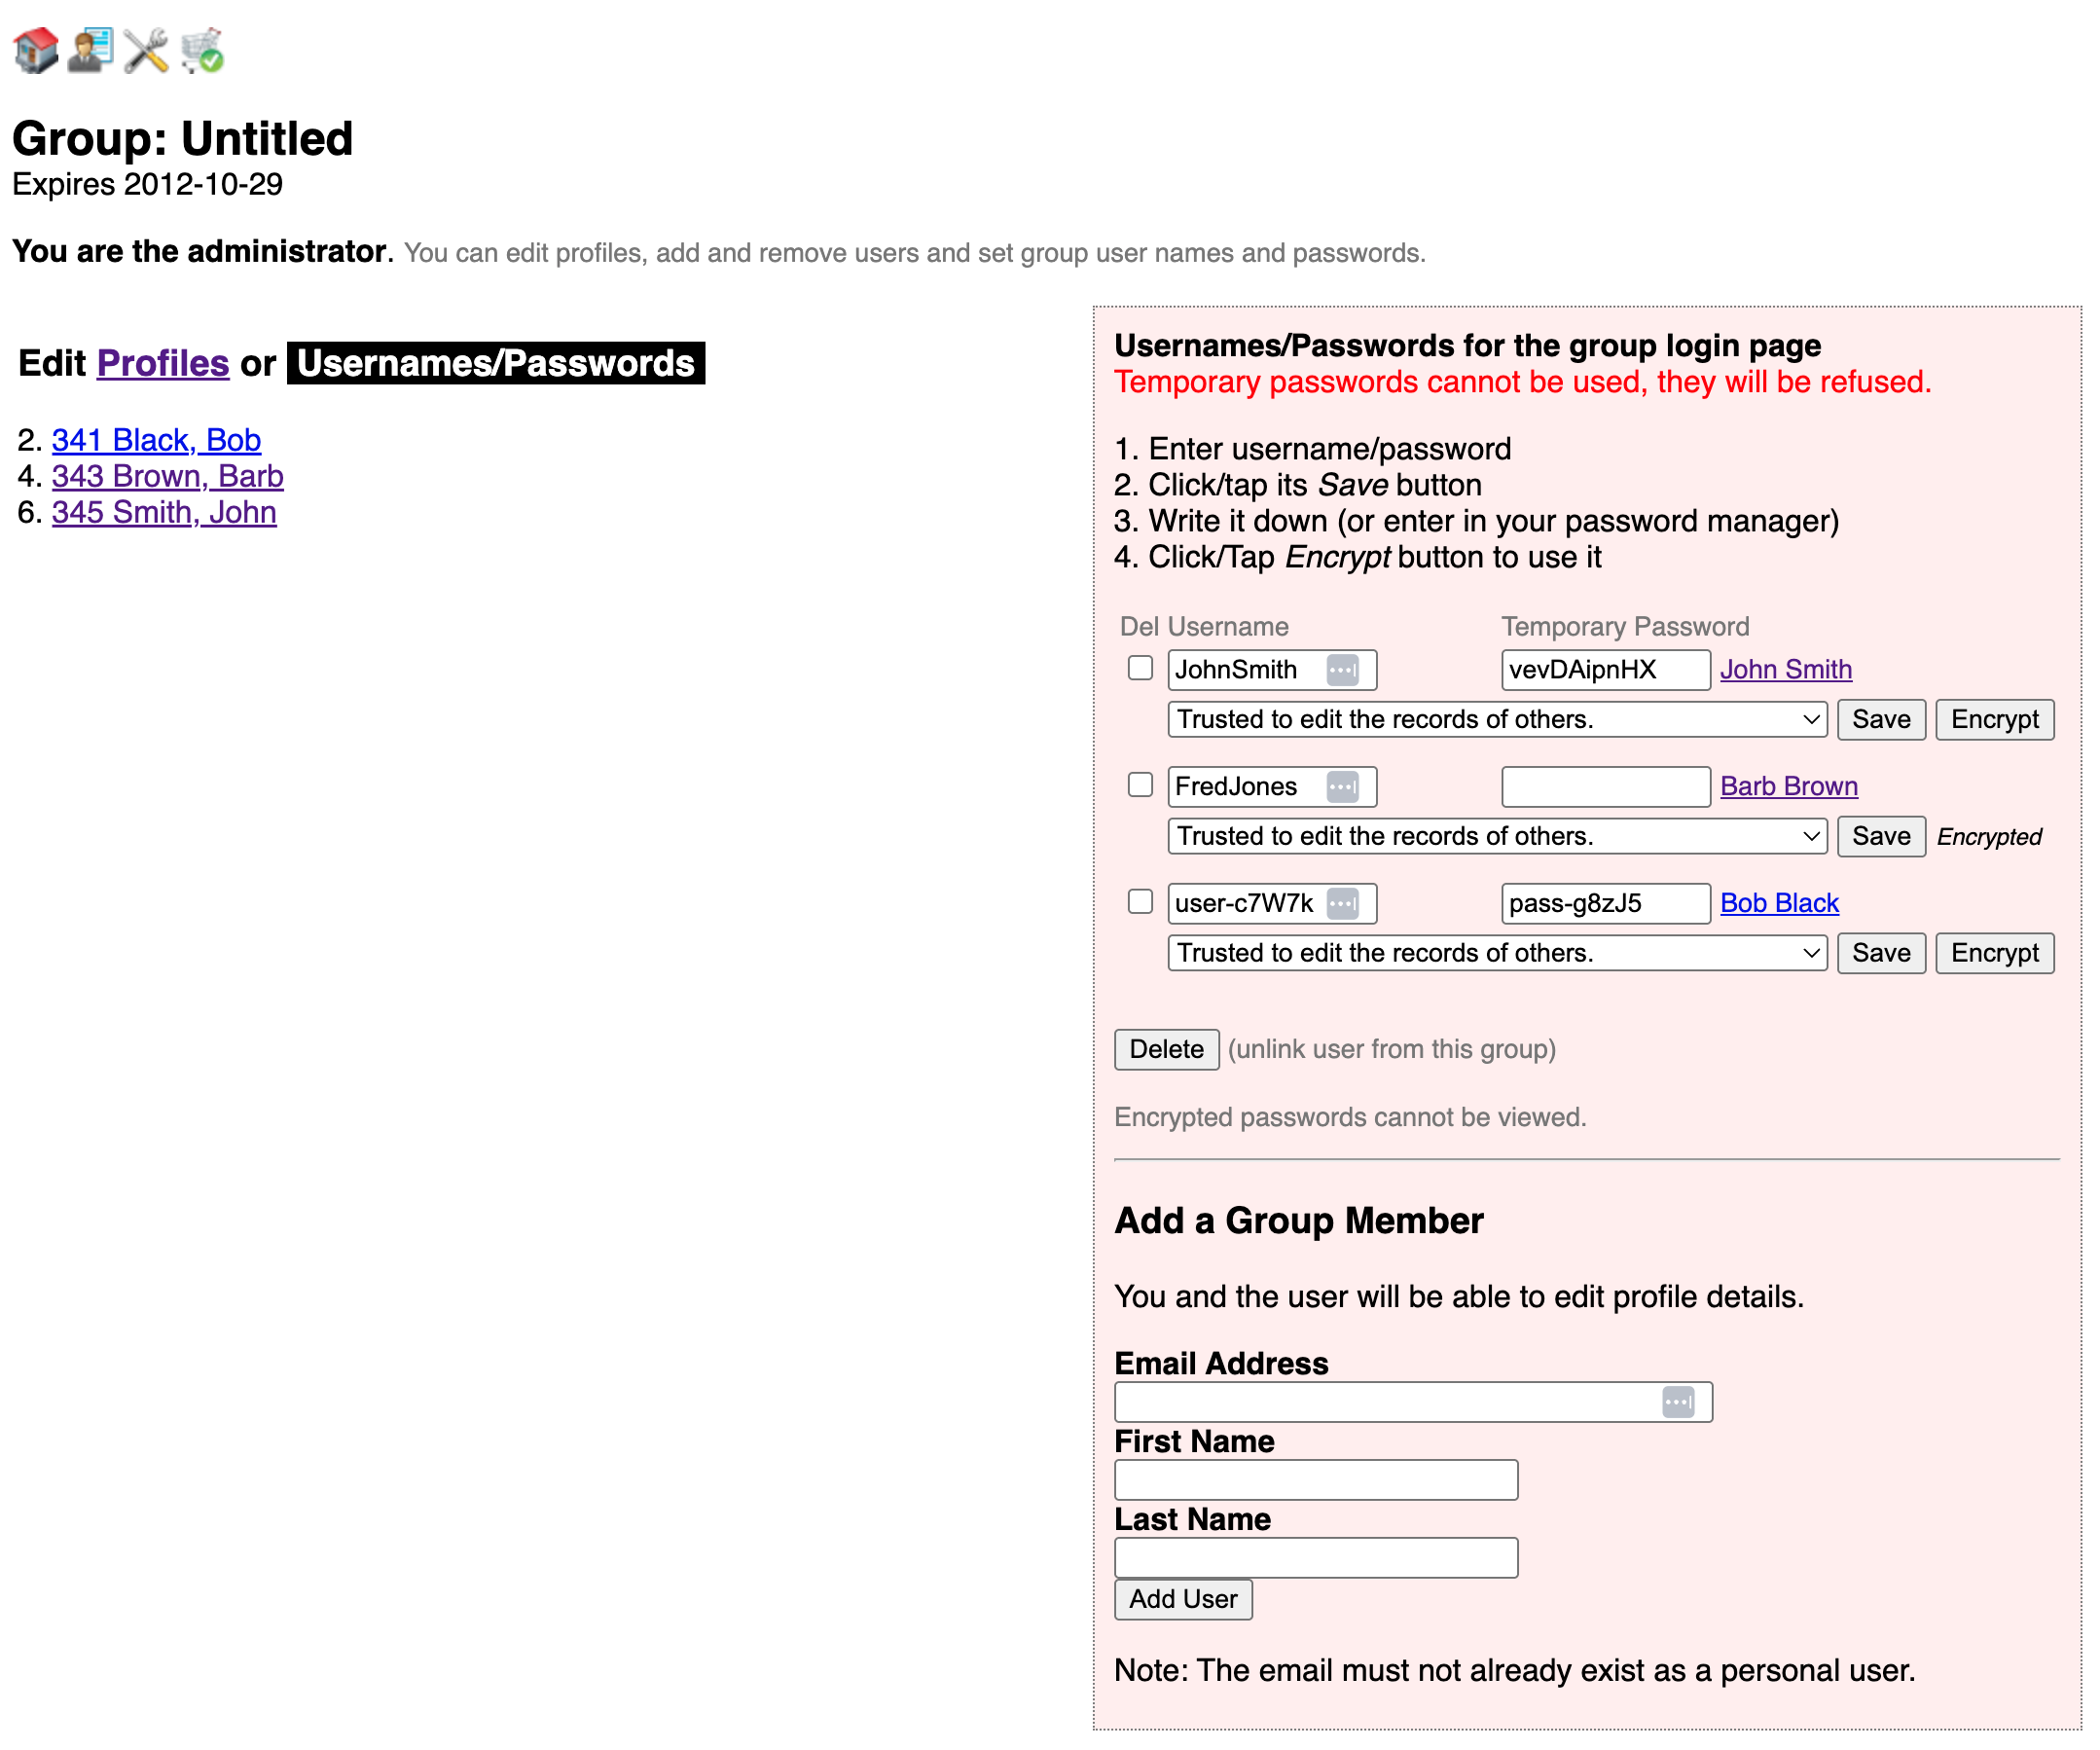
Click Usernames/Passwords to add users and edit individual credentials. Users cannot change their username or password; only you, the administrator, can do that.
- Use the lower section of this page to add new group users.
- Use the upper section to manage member usernames and passwords.
- Temporary passwords cannot be used to login, they will be refused.
- Create all the usernames and temporary passwords first (using the Save button for each)
- Save the passwords in your records (we recommend a password manager, e.g. Bitwarden, using a group account)
- Click/Tap the Encrypt button for each to enable their use
- Once encrypted, there is no way to view a password; enter a new one and encrypt that
Import and Export
For Whole Account Export see the last section below. This is an important aspect of our total system rewrite project beginning in 2026.
To import data into Insight-Live, a file is needed. That involves uploading. During the process, the importer will present a file dialog to enable locating the it. That means you have to know enough about your computer to be able to export the data from the source program into a specific location if needed (e.g. the desktop) and then be able to find it when importing. Many are text files that have been exported from the data source (e.g. a CSV file from a spreadsheet, an XML file exported from GlazeMaster, an XML recipe database from desktop Insight). Others are files that another program natively reads and writes (e.g. a DB file from desktop Insight, an RDB file from Matrix).
Go to Topic: Import and Export
Solve Real Problems
For examples of posts we have done about solving many specific problems check our inspiration page.
Go to Topic: Solve Real Problems
Desktop Insight

|
Desktop Insight is our interactive software that you download and install on Windows, Linux and Macintosh. It has been the world-wide industry standard since 1980. However we no longer support it (although from time to time we recompile it to improve compatibility with changes in computer hardware), our development efforts are now focussed on the insight-live.com webapp. Insight brings you the power of glaze chemistry to understand, formulate, fix and adjust glazes. Digitalfire.com provides training and reference materials that make it possible for almost anyone to take control of their glazes. |
Go to Topic: Desktop Insight
Privacy Policy
Example: https://hootsuite.com/legal/privacy Guide for Canada: https://termsfeed.com/blog/privacy-policy-canada/Go to Topic: Privacy Policy